Blues Scale #1 (G): The scale exercises presented in Flatpicking the Blues
primarily worked with scales across one and two octaves using patterns
in the lower regions of the neck (first six frets). On page 31 we
presented "box" patterns that displayed how you could move the blues
scales around to all areas of the neck. On page 32 you were asked to
explore this "box" patterns on your own, however you were not shown any
specific exercises in order to help you grasp those positions (with the
one exception of the scale exercise shown at the bottom of page 32).
When we presented the scale at the bottom of page 32 (which
connected box pattern 1 and pattern 2 from page 31), we suggested that
you explore other ways to connect these patterns. While the box patterns
taught you how to move across the neck, if you went through this
exercise you also learned how to move up and down the neck. The first
several blues scales on this page will provide you with some various
ways to move up and down the neck connecting the box patterns that are
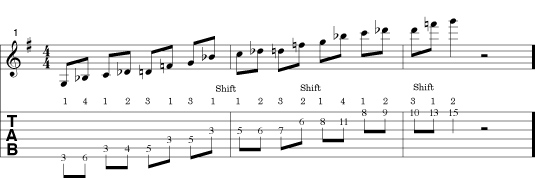
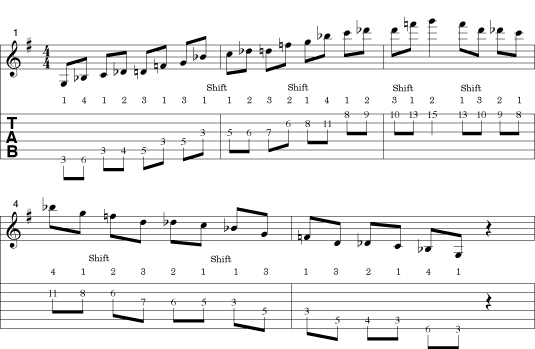
shown in the book. This first blues scale is the same as that shown on
the bottom of page 32, however, we have included the fingerings in order
to show a suggested position shift. Practice this two octave scale with
the position shift as it will be the basis of the next three scales
that we present on this page.
Blues Scale #2 (G):
This scale is the same as the previous scale but instead of just
ascending, you will ascend up the scale and then descend back down. Pay
attention to the fingering and position shifts. Once you have practiced
this exercise many times, go back to track 5 of your audio CD and
practice some free-form improvisation using this two octave scale as the
basis for your improv.
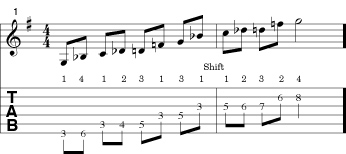
Blues Scale #3 (G):
This scale builds onto scale #1 by adding another octave, Here we are
connecting box pattern 1 (first octave) with box pattern 2 (second
octave) and then connecting box pattern 2 with box pattern 3 (first six
notes of the third octave), then moving to box pattern 5A for the last
two notes. In the book we only had room to give you one and two octave
scale exercises, however, practicing this particular three scale octave
will help you open up the fingerboard in a big way. The third octave
that we've added to this sequence is one where you are apt to do a lot
of note bending. Several of the note bending examples shown on page 33
of the book are up in this region of the neck.
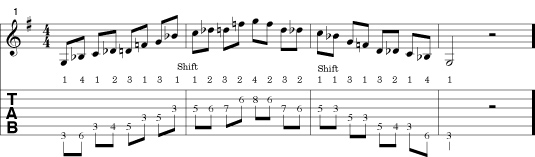
Blues Scale #4 (G):
This scale contains the same notes as the last one, however, here you
are working to ascending up the entire three octave scale and then back
down the scale exactly opposite of the way you ascended. Once again, pay
attention to the fingering and position shifts.
Improv: After you feel
comfortable with this exercise, go back again to track 5 of your audio
CD and work on some free-from improvisation using all three octaves of
this scale. Working with this exercise in a free-form manner will really
help open up the fingerboard for you in the context of the blues.
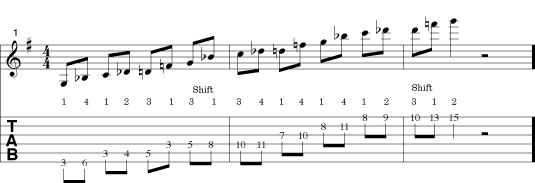
Blues Scale #5 (G):
Now we are going to start again with box pattern 1 and move up the
fingerboard, but instead of moving from box pattern 1 to box pattern 2
as we did in Blues Scale #1 above, we are now going to move from the G
note on the D string of box pattern 1 to the A note of the D string in
box pattern 3. You are playing the same notes as shown in Blues Scale
#1, but you are moving up in a different area of the fingerboard. Take a
look at the scale and practice it until you become familiar with its
movement and position.
Blues Scale #6 (G):
Now we are going to add the third octave scale of Blues Scale #3 to
Blues Scale #5. So basically you are starting with box pattern 1 until
you reach the G note on the D string, then moving into box pattern 3
with the A note on the D string and then staying with box pattern 3
until the last two notes when you then shift to the tail end of box
pattern 5A.
Practice: You will notice that
for the last two scale patterns (5 and 6) we only showed the ascending
line. It would be good if you practice both the ascending and
descending lines when you study these scales. Additionally, it would be
helpful to mix and match Blues Scale #3 with Blues Scale #5 by ascending
with #3 and then descending with #5 or vice-versa. Any variations that
you can come up with in your own practice are going to help when you
start to practice blues improvisation. The more familiar your fingers
and ears are with all of the various patterns and possibilities, the
easier it will be for your to improvise.
Improv: Speaking of
improvisation, after you have spent time practicing scale patterns #5
and #6, it would be a good idea to once again go back to practice track
number 5 of the audio CD and practice improvising with these new scale
patterns in mind.
Blues Scale #7 (E): The majority of the scales that we had you work with in Flatpicking the Blues
were in the key of G. At the end of the book in the section titled
"Moving to Other Keys" we talked about how you could convert all of the
scales you learned in the key of G to other keys and we gave some
examples on page 84. It is well worth the time and effort for you to go
through the exercise of converting all of the scales that were presented
in the book (and presented above on this site) to various keys,
especially the key of E.
Why the Key of E? The first
reason to work with the key of E is that a lot of traditional blues
tunes are played in the keys of E and A. As we stated in the book, it is
fairly easy to convert all of your G scales and licks to the key of A
because you just move them up two frets. Conversion to E is a little
more difficult. Another reason to become very familiar with blues scales
in the key of E is to help you get the blues feeling in your bluegrass
when playing in the key of G. Em is the "relative minor" in the key of G
and licks in Em fit nicely when playing in the key of G. Em blues licks
fit very nicely and if you play through some of your favorite signature
bluegrass runs in the key of G, like the Lester Flatt "G-run" for
example, you will find that they come directly from the E minor
pentatonic blues scale shown at the top of page 84 in Flatpicking the Blues.
We have provided some "G-run" examples as well as a few other popular
bluegrass runs in the key of G that are based on the E minor pentatonic
blues scale in the "blues licks" section of the website.

Practice: Practice becoming
very familiar with the open position E minor pentatonic blues scale
shown here as Blues Scale #7. It is the same scale shown at the top of
page 84 in the Flatpicking the Blues book, however, we have
added one extra G note at the end. Work to becoming familiar with this
scale and some of the licks that are based on this scale as shown in the
blues licks
section of the web site, then play through some of your favorite
bluegrass solos in the key of G and see if you can recognize the sound
of the E minor pentatonic blues scale in your own playing.
Another good practice exercise with this scale is to try
and transpose the ascending and descending patterns shown in G on page
29 of the book over to the key of E using this open E blues scale. You
can also try to connect these ascending and descending lines across two
octaves as you did for the key of G in the homework problem on page 30.
Improv: Go back to the
two-minute G rhythm track on your audio CD. Practice some free-form
improvisations mixing notes of the G blues scale with notes from E blues
scale (Blues Scale #7). Stay in the open position at first, later try
it in closed positions.
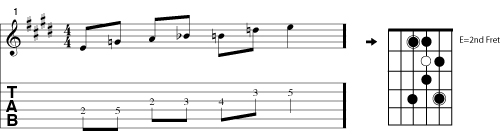
Blues Scale #8:
After you work with the E minor pentatonic blues scale in the open
position, it is a good idea to play that scale at various locations on
the fretboard (working with the "box" patterns shown on page 31 and page
83 of the book), as you did with the G blues scale in the book. In
bluegrass you will use the open position scale (Scale #7 above, which is
based on box pattern #1 from the book) most of the time, however,
another position that you will use quite often the "core" scale of box
pattern #2. This is the closed 2nd position scale which starts on the E
note at the 2nd fret of the D string and ends at the E note on the 5th
fret of the B string.